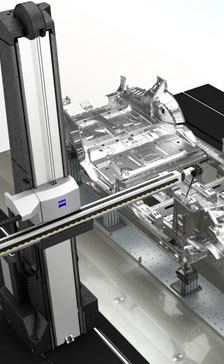
Detail:
| Carl Zeiss offers a device that is of particular interest to medium-sized companies, suppliers and manufacturers in the automotive industry: CARMET, the horizontalarm measuring machine. Precision, longterm stability and investment security have been systematically incorporated into this new development. |
 |
|
Key features
CARMET has been optimized to ensure that the maximum measuring range is available for the specified machine dimensions. Integrating the controller into the measuring machine not only decreased the number of interfaces, but also simplifies installation and reduces system footprint. The unique trapezoidal structure of the Z column with a bionic design is based on nature, thus enabling a stable and simultaneously effective design solution.
Machine technology
All axes are equipped with proven linear guide - ways featuring ball chains for an optimal service life, accuracy and rigidity. The panels on the column can be removed in only a few steps. The components relevant to maintenance are easily accessible and replaceable, thus reducing maintenance times and increasing availability.
Sensors
CARMET II comes standard with the RDS-C stepping articulating probe holder featuring CAA. In conjunction with the CAA computer-aided correction system, RDS is a real calibration wonder. RDS-CAA calibrates automatically by mathematical calculation. It calibrates 8-12 angular positions and uses the stylus in all 20,736 positions. You simply cannot measure any more flexibly. RDS-CAA makes it possible to change a stylus manually or auto matically with a high degree of precision and without recalibrating the stylus. You can move all styli into any angular position without delay.
|
|
